Using the Pidgin Instant Messaging Client (Windows)
This section provides step-by-step instructions on how to use the EX Instant Messenging (IM) Service using the Pidgin IM client.
Prerequisites
Before proceeding the user must have an Instant Message (IM) client connected to the EX IM Service. For more information, please refer to: Connecting to the IM Server using Pidgin (Windows).
1 to 1 Chats
Once you have successfully connected to the EX IM Service, you may send/receive messages from other users. Your “Buddy List” window displays the names of other IM users that are currently online (optionally, the buddy list displays offline users in grey text). You may only send an IM to users who are currently online.
Initiating a 1-to-1 Chat
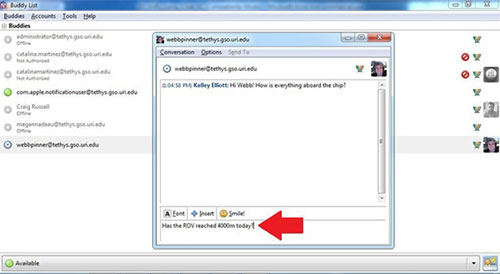
1. Double click on the desired username in "Buddy List" window. This will open a "Conversation Window".
- The Conversation Window allows you to exchange messages with the desired user.
- The top portion of the Conversation Widows displays both sides of the conversation.
- The bottom part of Conversation Windows is for submitting new messages.

2. Send a Message
- Enter text into the lower text box of the Conversation Window.
- Use the "Font" button to change the size and font of the text. This is not recommended as it may potentially render incorrectly and confuse the user.
- The "Insert" button allows you to send files, pictures, etc. to the other user. If you are sending files to/from the Okeanos, please be respectful of file sizes. Bandwidth to/from the vessel is limited.
- You may use the "Smile!" button to send emoticons in you messages.
- When you are done composing your message, press the “Enter” key to submit it. Your message should appear in the top text field in the Conversation Window.
Your recipient's responses will appear in the larger window below your message. You can add new messages to the chat session at any time. When the conversation is complete you can end the session by closing the chat window.
Multiple 1-to-1 Chats
It is possible to engage in multiple 1-to-1 chats simultaneously. Additional chats will appear in the Conversation Window as tabs.
Group Chat, a.k.a Chat Rooms
Group chats or chat rooms allow two or more people to engage in a single conversation. It is possible to create new chat rooms as well as join chat rooms that are already in progress.
Creating a Chat Room
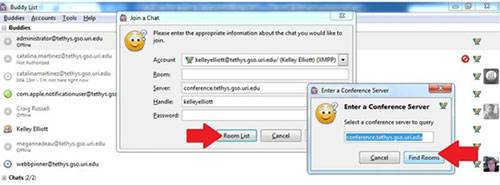
- From your “Buddy List” window, click the “Buddies” --> “Join a Chat".
- Enter a name for the chat room (i.e., "ROV Site Selection"). Any name for the chat room is acceptable EXCEPT for "eventlog". This name is reserved for the EX Eventlog.
- Click "Join".
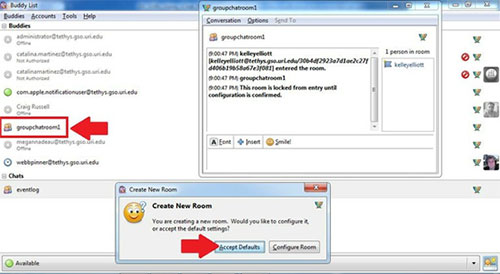
- If prompted to "configure the chat room," click "Accept Defaults". This will open a "Conversation Window". If a Conversation Window is already open, (i.e., you are engaged in a 1-to-1 chat), the chat room will appear as a new tab in the existing Conversation Window.

Conversation Windows for chat rooms have three sections:
- The top text box is the chat window, it shows the conversation.
- The bottom text box is where you submit new messages.
- The right side of the Conversation Window is the room roster.
Adding Buddies
- To add a buddy to a chat room, drag the buddy's name from your buddy list to the roster section of the Conversation Window.
- When prompted, confirm the invite. You may optionally include a message explaining the purpose of the invitation to the invitee.
Joining an Existing Group Chat Room
If you wish to join a chat room already in progress there are two options.
- Have someone already in the chat room send you an invite.
- Search the Chat Room, Room List.
Searching the Chat Room, Room List
- Click the "Room List" button.

3. When prompted for a Conference Server, type: "conference.noaasrs2.gso.uri.edu". This should be already be entered by default.
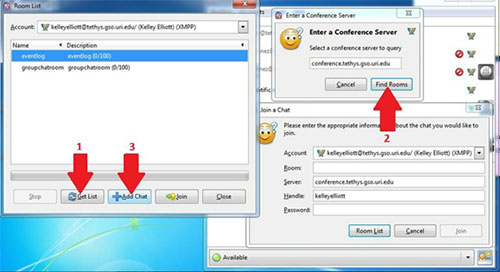
4. Click "Find Rooms". This will populate the "Room List" window. You may have to move the "Join a Chat" window out of the way to see the "Room List" window.
5. In the "Room List" window, select the chat room you wish to join and click the "Join" button. This will open the Chat Room window.

Sign up for the Ocean Explorer E-mail Update List.
