


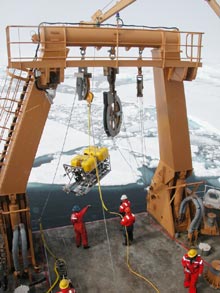
The ROV is deployed off the back of the boat using the Healy's Crane. Click image for larger view.
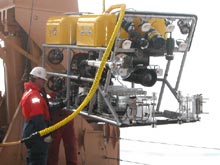
DSSI’s Jerry Caba conducts a final check of the ROV systems before deployment. Click image for larger view.
Arctic ROV Operations
June 30, 2005
Jerry Caba
I have to give credit to some of the people who have had a strong desire to explore the frozen Arctic. I did not anticipate what a fantastic experience it would be. The environment is not only completely different on a personal level, but as an ROV operator it is challenging as well. Our company has carried out scientific operations in the past. These are demanding, but on this project we have to deal with phenomenal depths (over 9000 feet), extremely cold temperatures, and the last thing I thought I would ever have a problem with, large chunks of ice when deploying and recovering the ROV.
Our ROV has been specially configured to deal with these conditions. ROVs are normally powered and controlled with copper wire cables, not unlike the wiring in telephone and power lines. In our case, the copper in the “cables” have been mostly replaced with glass fibers. Using light to transfer information and data, these fibers provide quicker and cleaner communication including high definition video, at great depths. A long pole with a hook on the end to push ice out of the way, and some skillful maneuvering of the boat are the best way to deal with the ice!
We unpacked the ROV and equipment and set it up in its operational location for the cruise. The ROV is kept in a heated hangar-type bay on the back deck called the “high bay.” The ROV control console with viewing monitors and power supplies is set up in a freezer next to the science lab.
One item needing particular attention during set-up is the fiber optic connection between the control consoles, the winch, the clump weight junction box and the ROV. These connections are accomplished by following a detailed procedure that involves cutting off the fiber and insulation at exact measurements, then carefully trapping the fiber in special molded plastic terminals. If the connection is not done just right, too much signal is lost in the terminal and it has to be cut off and discarded, then re-done. This happened once to us during set-up. Each time the connection is re-done it takes 30-45 minutes per fiber-optic terminal; we have seven of these terminals on our ROV.
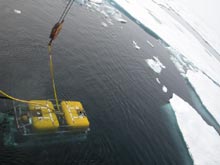
A view of the ROV as it descends under icy Arctic waters. Parts of the ROV have been specially configured to handle cold, and deep ocean conditions. Click image for larger view.
The ROV has different sampling instruments installed depending on whether the scientists want to explore for mid-water or benthic creatures. The ROV arrived ready to operate on the seabed, but the scientists decided that we would operate in mid-water for first dive. We get the ROV ready by removing the manipulator arm and installing mid-water sampling devices. After changing devices, the ballast (weight) of the vehicle is adjusted to account for the weight difference between the heavy manipulator arm and very light sampling devices.
Weighting the ROV correctly is important because when drifting in mid-water, you do not want to have to thrust too much upward or downward. The thrusters disturb the animals you are trying to capture, and might push them away. Initial tests to establish neutral buoyancy, therefore, are very important.
The initial ballasting procedure is also a good opportunity to check other systems on the ROV, and provides a good opportunity to check for water leaks. On our first in-water test in the Arctic, the ROV operator tilted the High Definition (HD) camera downward to see if any water collected in the dome. Guess what? It leaked, despite having been pressure tested several times to 10,000 feet.
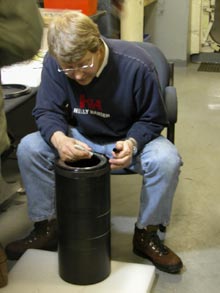
Chris Nicholson repairs a leak in the High Definition camera housing by re-sealing the dome. A seal within the camera housing most likely “popped” outward during it's unpressurized flight from Massachusettes to Alaska. Click image for larger view.
The culprit behind the leak came as a surprise. The ROV was transported from Massachusetts to Alaska in an unpressurized cargo aircraft. The HD camera had been built and tested to withstand high pressure from the outside, but not the inside. During its unpressurized flight to Alaska, the air inside the camera expanded, pushing the camera dome and rubber seal outward.
We did not learn about the popped seal until we tested the ROV underwater. Water was slowly leaking in the camera housing and when the ROV was tilted downward, there was a puddle inside the dome! Salt water and electronics don't mix very well and the situation could have been disastrous! We quickly removed the ROV from the water and learned that we were lucky. The water only went inside the front dome. After taking the HD camera apart and re-sealing the dome, we deployed the ROV later in the evening and confirmed the leak had, in fact, been fixed. The ROV is now up and operational, providing us with an eye in the deep, Arctic Sea.
Sign up for the Ocean Explorer E-mail Update List.